Test Plans
Today we learn how to plan a test. What's a test plan? What goes into a test plan? What can we test? How do web developers take a structured approach to testing? Plus, a few fun demos!
Table of Contents

What is a Test Plan
A test plan is… well, a plan on how you'll test!
Here's what every test plan needs:
- A definition of what you'll test
- A definition of which attributes of that thing you're testing
- A definition of the parameters of the test
- A definition of success and/or failure
- The tools with which to test
- A justification for all of the above
- The resources required by the test
Implicit planning items
Sometimes some of the above are implicit, meaning they're not written down because everybody already knows about it. Be careful with your assumptions about who knows what, though! If you don't know your audience, you might be wrong about what they know. Even if you do know who is in your audience, some things may be up for debate!
An example
What's a kind of test we've all taken? An exam!
A test plan for a history exam might look like this:
Students1 are being tested on their knowledge of history based on the readings assigned from this year's textbook2.
They'll be answering 25 multiple choice questions in 45 minutes, with no notes or access to the textbook3.
A mark of 60% is considered a pass4.
The exam sheets with questions have been photocopied5 and are to be picked up from the front office by an instructor before 9 a.m. on the day of the exam.
This exam has been vetted by the administration6 as meeting the province's testing guidelines.
A request has been submitted for use of the exam room and two exam proctors7.
Today isn't about how to test everything
There's so many things out there that can be tested on a website, some of which can be pretty far outside the domain of web development. Market research, user experience, analytics um… analysis. All things that require test plans, but are outside of the scope of Security and Quality Assurance.
Additionally, we'll be looking at how to test security measures later on in this course (although most of what we talk about today will apply), and we'll look at how to test usability and accessibility next semester.
Today we'll focus on 1) plans to test web application code that generates web pages (which is what you've focussed on in your courses so far, including this one), and 2) how to test your application as your end-user experiences it.
First we'll talk about what web application test plans have looked like in the past, and what they look like today.
Traditional Software Test Plans
Traditional software test plans were based on older software development cycles - releases came out as discrete versions, and were updated rarely (if ever).
You had to test an application with the assumption that once it was in the users' possession (usually in the form of physical media like a floppy disk or CD-ROM), that was the end of it. It either worked or it didn't.
Traditional test plans were massive documents that had standards on how to write them Opens in a new window.
They had to be bulletproof, because once your software shipped, there was no way to update it. It was a slow process, because it was your one chance to get things right.
If this is sounding familiar, it's because we talked about a similar issue with git branching models a few weeks ago! The web truly is a new kind of software, and that has big impacts on how we perform quality assurance practices like revision control and testing.
Modern Web Test Plans
Modern test plans are a product of the "agile" workflow - release early, release often. If something's broken, we'll fix it when we need to. When we have time. ASAP. Definitely tomorrow.
Modern testing is extremely flexible - to a fault. Remember when I said that a test plan should contain the resources needed for the test? That's because testing requires resources (time, effort, servers, payroll, etc.), and needs to be lobbied for.
A solid shop will have a Quality Assurance team, and they'll be responsible for drafting the test plans. As we look at an example of a QA test plan, keep in mind that each shop has their own template, and the testing described is likely to contain both automated and manual testing.
- Test Plan Template Opens in a new window, Mozilla
- Test Plan Template RTF download, strongqa.com (RTF)
- Test Plan Template PDF download, softwaretestinghelp.com (PDF)
Example of a QA Test Plan
- Overview
- Purpose Summary of scope, estimates, risk, assumptions, milestones and deliverables
- Scope What's being tested and how
- Ownership Who's doing what, and when they're needed
- Testing summary
- Scope of Testing
- In Scope What will be tested
- Out of Scope What won't be tested
- Scope of Testing
- Requirements for testing
- Environments Operating Systems, Devices, Browsers, etc.
- Channel dependent settings (configs) and environment setups Staging environments, A/B testing software, etc.
- Test Strategy
- Risk Assessment and Coverage Categories created based on weighted assessments of what can go wrong, how bad it would be, and how likely it is.
- Test Objectives Individual features or functions being tested, what the test demonstrates, pass/fail criteria, type of testing, including information on the risk assessment category, and who is responsible for the feature.
- Builds Links to different environments
- Test Execution Schedule If releases are scheduled, how does this testing fall into that schedule?
- Testing Tools Software and hardware required for testing, documenting, and assigning bugs.
- References Links to other documentation - requirements, user stories, system specifications, etc.
- Test cases
- Test Areas A list of variables under test, i.e. different browsers, screenreaders, keyboard-only operation, RTL support, natural language support…
- Test suite The test-tracking software used by the QA team
- Bug Work The process for tracking and assigning bugs and their fixes
- Sign off The criteria for a successful testing phase - test cases executed, bugs fixed, code coverage, etc.
Now, you know I love to tell you about other people's jobs when they're people you'll be working with. It's great for communication, collaboration, and, eventually, career moves (either switching teams or moving up to management).
That being said, most of you will end up either someplace large enough to have a QA department, or small enough that you won't have access to the resources required for large-scale test planning.
With that in mind, let's look at how developers think about testing - the kind that's integrated with your code, and/or runs as part of your deployment pipeline. In other words, the tests you have to write, or pass when it runs automatically!
In order to talk about this, let's begin by talking about what can be tested.

What can be tested?
How things work
First off, we can test that our code is working. That is to say, it returns what we expect it to return, and it doesn't break anything.
This is the type of testing we've done so far - unit testing. Does your code do what it claims to do? Every time?
This is also the category that integration testing falls under. Integration tests are unit tests on a larger scale - testing other functions to make sure your functions don't break them when they work beside, or are called by, those other functions.
Integration testing typically uses the same libraries as unit testing (i.e. Mocha if you're using Mocha, Jest if you're using Jest), but because it tests more stuff (making it run slower), and finds bugs less frequently, it run usually done on a remote server as part of your deployment pipeline (i.e. when you push to remote).
Beyond "how our code works", we can look at things from the end-users point-of-view. Does the application that our code has built act properly and look right?
How things behave
Does clicking a button do what a button click is supposed to do? Does it submit your form, close your modal, change your colour scheme?
Sure, you could just click that button yourself (and you probably should at some point), but then you'd have to try it in different browsers, and you'd have to see what happens when you triple click it, and you'd have to try it when the menu was open vs. when the menu was closed, etc.
Wouldn't it be nice if you could leave the manual testing to the QA team, but also minimize the number of times a QA tester walked over to your desk with a frown on their face?
That's where end-to-end testing (E2E) comes in.
End-to-end testing uses automated browsers to act like a user, working through different user stories to "act out" how users will use the application.
E2E testing libraries use tests (with syntax very similar to our unit testing frameworks) to declare expectations about how the application will behave, and see whether the application succeeds under those conditions.
End-to-end testing demo
I've created a demo on GitHub Opens in a new window of end-to-end testing with a very popular framework called Cypress Opens in a new window.
Check out this week's lecture for a full walk-through of the demo. To try out the demo yourself:
- clone the repo,
- use
npm installto install the dependencies, - run the command
npm run serverto start a server that will "serve" your pages so cypress can visit them, and finally - in a new cli window (because the server is running in the first one), run the command
npm run cypress-e2eto run the test
Cypress, by default, looks for tests in the /cypress/integration/ directory.
If you take a look at the file /cypress/integration/spec.js, you'll see a simple set of tests that check to make sure the navigation is working correct.
Cypress syntax should be very familiar from working with Mocha:
// Create a test suite
describe(`My test suite name`, () => {
	// Create a test case
    it(`does what I'm expecting`, () => {

    });
 	// Create another test case
    it(`does another thing I'm expecting`, () => {

    });
});
Inside our test cases, Cypress can do things that Mocha or Jest aren't built for - clicking buttons, filling forms, and navigating through pages.
it('goes to otherpage on button click', () => {
  // Get the DOM element and trigger an event
  cy.get('#theOnlyButton').click();
  // Expect the page's path to equal '/otherpage.html'
  cy.location().should((loc) => {
      expect(loc.pathname).to.eq('/otherpage.html')
  })
});
All this stuff happens pretty quickly (although nowhere nearly as quick as unit testing), and it happens invisibly - using a "headless" browser.
Amazingly, though, these invisible actions get recorded to video (check out /cypress/video/), so it's very easy to see where something may have gone wrong!
Cypress can run your tests using different browser engines Opens in a new window and device sizes & user-agents Opens in a new window, so you can automate your cross-browser and cross-device testing.
How things look
We're going to use Cypress again to show how we can perform "visual regression" testing.
Visual regression testing, as you may recall, checks a screenshot against a preexisting screenshot to see what, if anything, has changed.
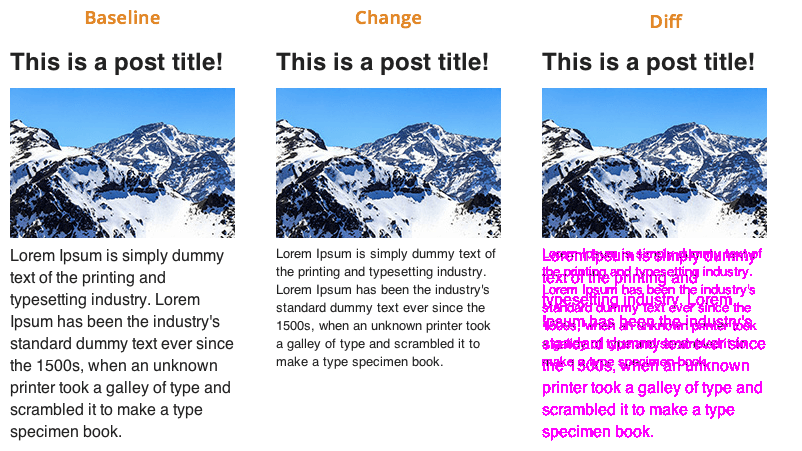
Cypress doesn't do this natively, so our demo uses a plugin called cypress-visual-regression to add this functionality. This isn't much of a stretch, since Cypress already has the ability to run headless browsers and take screenshots.
The syntax (as contained in /cypress/integration/visual-regression-tests.js) is pretty straightforward:
it('should display the home page correctly', () => {
  cy.visit('/');
  cy.compareSnapshot('home', {
    capture: 'fullPage',
    errorThreshold: 0
  });
});
As you might glean from this, if you want to you can take screenshots of individual components rather than the full page, and set the error threshold above 0 (for example, a value of .05 would mean that 5% of captured pixels could be different without the test failing.
Visual regression demo
Go ahead and try this out! If you still have your server running from before, you can simply run the command:
npm run cypress-visualIt should pass the test. To see the test fail (which makes for a more interesting visual diff), edit the file /public/style.css on line 26, and run the cypress-visual command again.
The screenshots from your tests are located in /cypress/snapshots/, where there are folders called:
/base/- contains the baseline screenshots (what things used to look like)
/actual/- contains the actual screenshots (what they look like now)
/diff/- contains the images that combines the two to highlight the differences, respectively.

Web Developers' Test Plans
So now you know a bit about test plans in general, software testing plans (both old and new) in particular, how QA writes their test plans, and what kinds of stuff web developers can write automated tests for.
But what kind of test plan should you, as a web developer, be working with?
Here's the best plan I can offer you:
- Write lots of unit tests
- Be nice in your code reviews (and write code that's nice to review Opens in a new window)
- Practice ABD4YQA (always buy donuts for your QAs)
That's it - that's a good test plan for devs at the beginning of their careers.
There's a few other things we can keep in mind as developers, particularly if we're in a position to have opinions about testing, or we just want to pick the brains of our friends in QA and devOps.
Test Coverage
Test coverage is a metric that can tell you how much of your code is subject to unit testing.
It's pretty straightforward to generate a test coverage report, so let's jump straight into the demo, and I'll tell you what stuff means.
Test coverage demo
I've created a demo on GitHub Opens in a new window to show you what test coverage looks like.

npm install && npm run test, you can see this too!This demo is written using Jest instead of Mocha. Mocha has a modular approach to being a test framework, so it doesn't have coverage built-in (since not everybody uses it). To use Mocha and get a coverage report, the most popular option is to use the Istanbul coverage library Opens in a new window.
I went with Jest for this demo, because all you need to do to get a coverage report is run Jest with a --coverage flag:
npm run jest --coverageI've purposefully left some code "uncovered" so we can see what this looks like.
The coverage report breaks down like this:
- Function coverage
- Has each function been called?
- Statement coverage
- Has each statement in the program been executed?
- Branch coverage
- Has each branch of each control structure (such as in if and case statements) been executed?
- Line coverage
- Has each executable line in the source file been executed? (This one is sort of a catch-all).
I'll walk through the demo in the lecture to give you a better idea of precisely what's going on in the demo.
It's probably a good thing if your code coverage is high.
It's not necessary to be 100% covered all the time.
Testing every possible edge case isn't a good use of your time. Don't write tests for the sake of writing tests. Write them to write better code.
When a measure becomes a target, it ceases to be a good measure.
Marilyn Strathern Opens in a new window
Use code coverage as a benchmark - if your team has been writing buggy code, try to get your coverage numbers up, and see if it helps. If it does, try to keep it in that ballpark.
Component Testing in Frameworks
There's one subcategory of testing I haven't mentioned yet because it requires installing a whole framework, which would introduce a layer of complexity that would not be worth the trouble for some of you.
That testing type is component testing.
Component testing is a kind of middle-ground between unit testing and integration testing, and between static code testing and browser automation.
In the React component testing Opens in a new window, for example, you use JSDOM Opens in a new window - not as a headless browser, but as a rough approximation of your component as a browser would see it, and send mock data (or even mock components) to your components.
You're all going to end up using a wide variety of frameworks (if you use them at all), so we're not going to have time to look at how specific frameworks test their components.
That being said, the preferred solution for all major SPA frameworks (React, Vue, Svelte, and Angular) at this point is the difficult-to-Google Testing Library Opens in a new window.
I expect that once you're somewhat comfortable with your framework of choice, testing your components will come quite easily, particularly with the help of Testing Library.
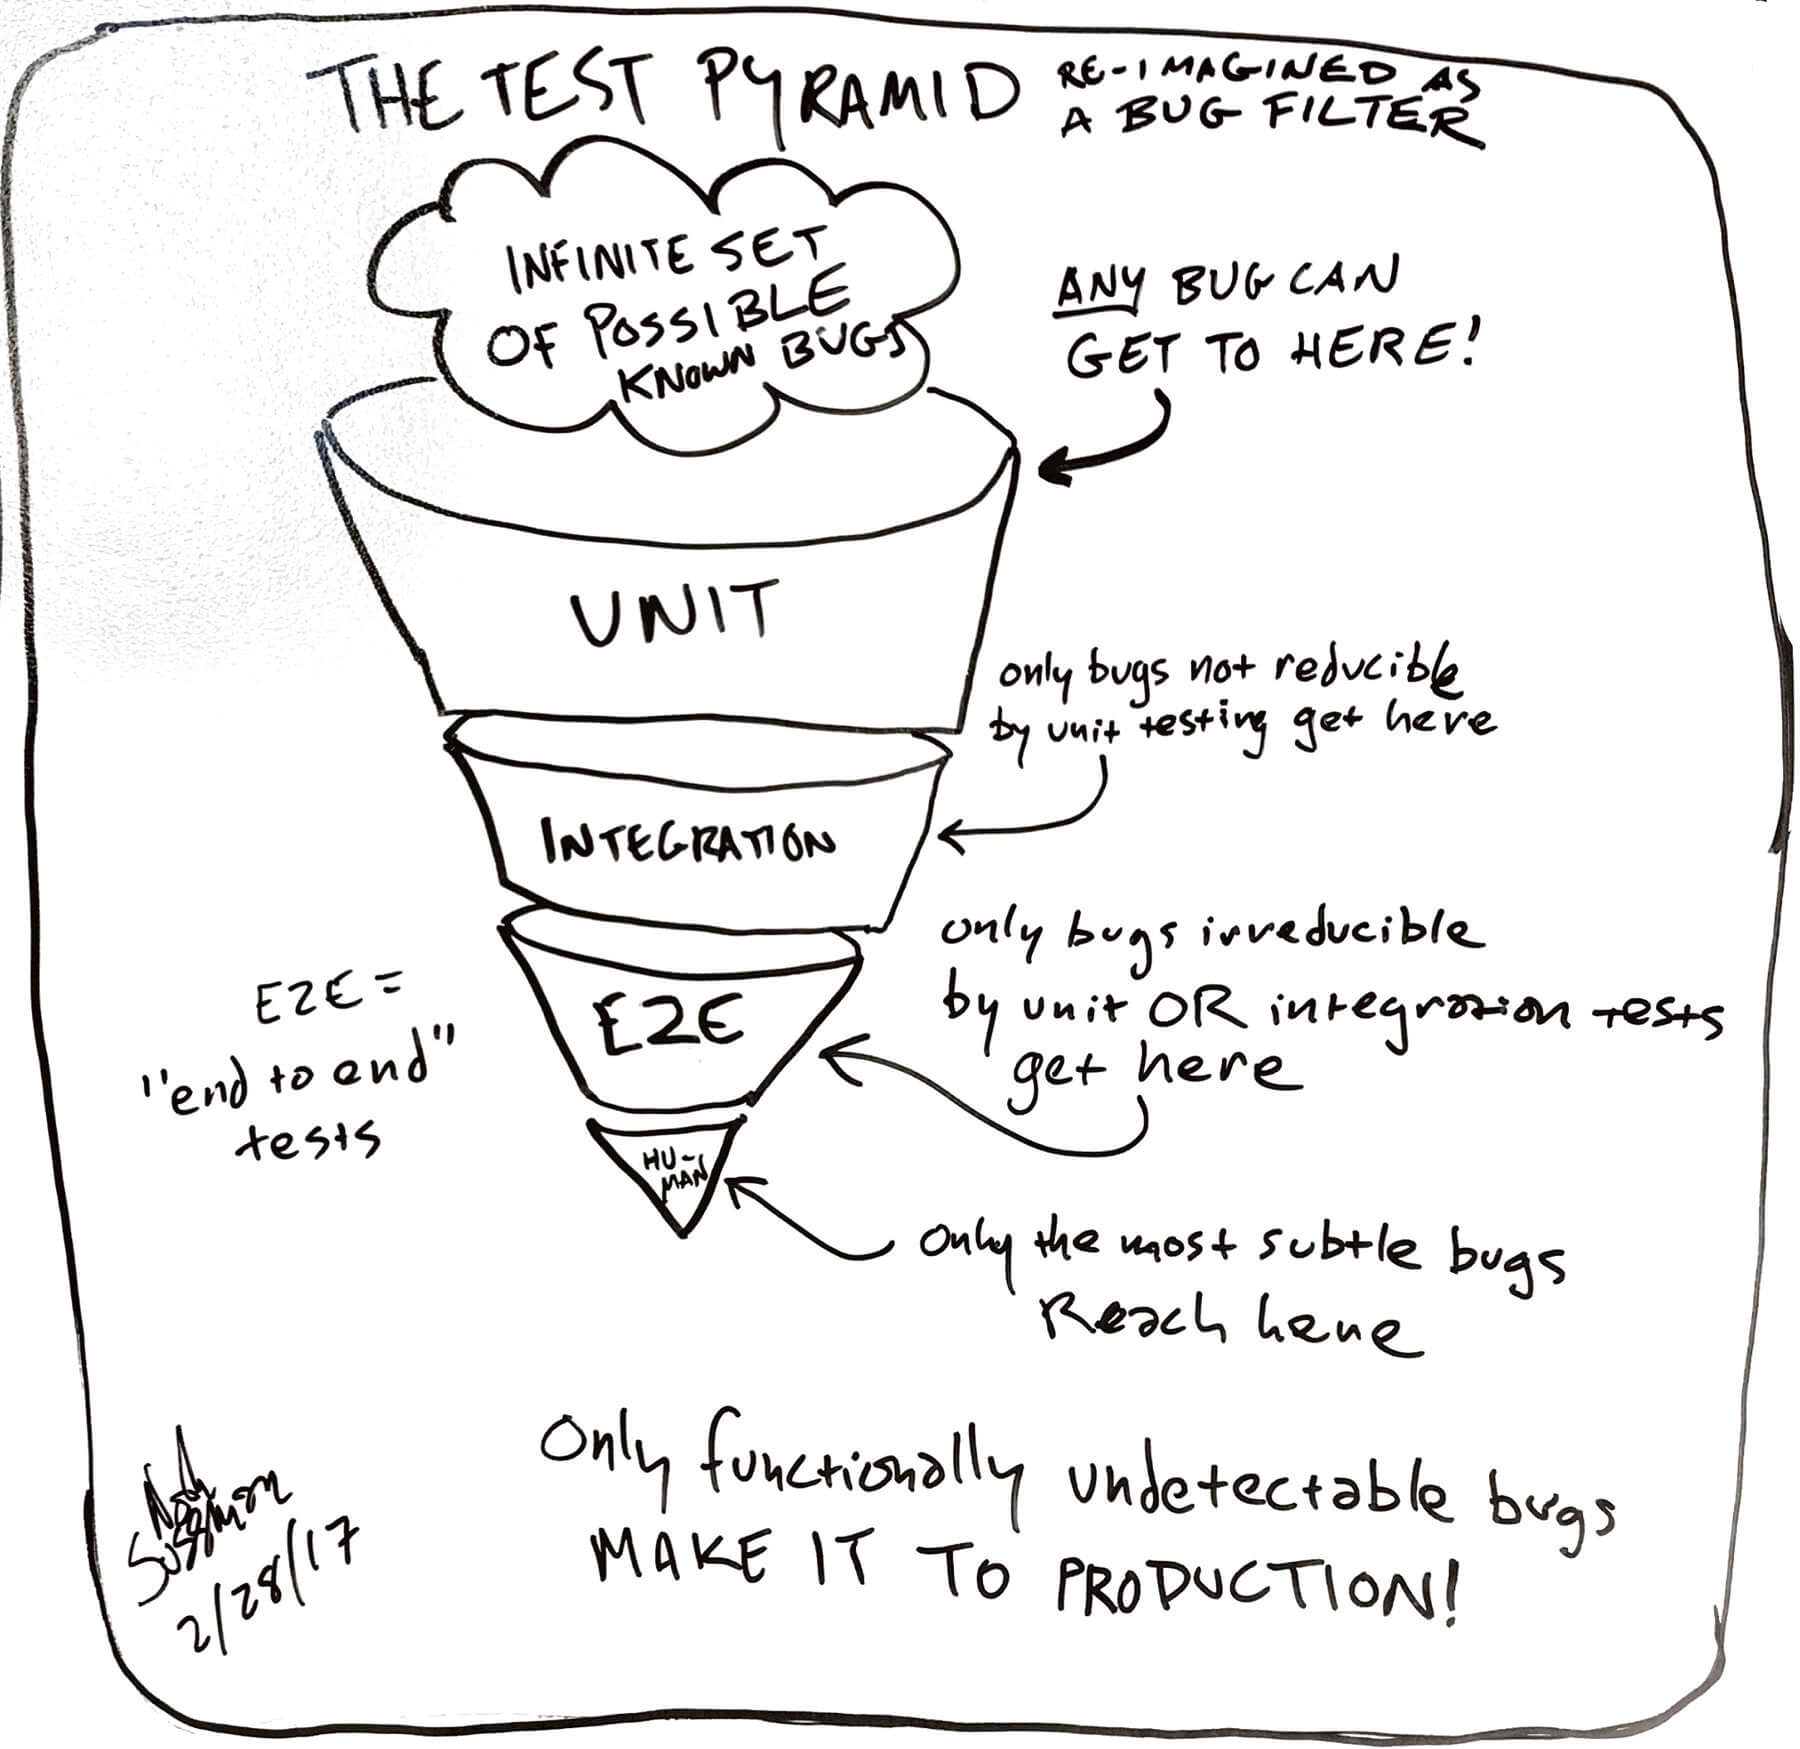
The Testing Pyramid
The final thing I wanted to discuss when it comes to testing as web developers is the "test pyramid".
This is a mental model for test planning. Even when you don't have a test plan written down, you can follow the principle described here.
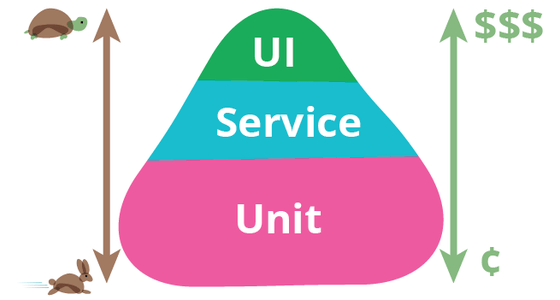
The basic idea, as described by influential programmer Martin Fowler, is this: start with tests that are fast to write and fast to run (unit tests).
Tests that are slower to write and slower to run (integration tests) should be written less and run less. Tests that are slowest to write and slowest to run (end-to-end tests, or any test involving a person) should be run last.
Put another way - bugs are "funneled" so that most bugs get caught by the "cheap" tests, which can cast a wide net. Manual QA testing, user testing, and client approvals are expensive. The more bugs caught early by automated processes, the cheaper the whole thing becomes.