Today we talk about git, git's role in team/deployment workflows, how to perform a code review.

What is Version Control?
Now you've used git a bit already, but you might also be familiar with version control from applications like MS Word Opens in a new window, or from trying to manually manage versions.
One of the most magical things about computers is the time-travel afforded to us by the concept of undo and redo. Extending this magic to every change made to a file, indefinitely, is a really powerful idea.
Version control not only lets us step backwards and forwards in time, but with the concept of "branching", allows us to explore alternate timelines that diverge from, and then merge with, the main timeline.

The standard in software development today is to use a distributed version control system, where each contributor has a copy of the whole codebase, including the full history, on their machine.
There are a few Opens in a new window other Opens in a new window other distributed version control systems out there besides git, but they work pretty much like git, and basically everybody uses git Opens in a new window.
Notice I'm saying 'git' and not 'Github' (despite the fact that pretty much everybody uses Github, too).
That's because git is a piece of open-source software. Github is a company owned by Microsoft that lets you host your remote git repositories with them. You don't need Github to use git - you can host your own repositories, or host them with a Github competitor like GitLab Opens in a new window or Bitbucket Opens in a new window.
![[Cueball points to a computer on a desk while Ponytail and Hairy are standing further away behind an office chair.] Cueball: This is git. It tracks collaborative work on projects through a beautiful distributed graph theory tree model. Ponytail: Cool. How do we use it? Cueball: No idea. Just memorize these shell commands and type them to sync up. If you get errors, save your work elsewhere, delete the project, and download a fresh copy.](https://d33wubrfki0l68.cloudfront.net/7e4f430a7a54096ce4fa6364374a41bc8d252e32/9695e/images/xkcd-git.png "If that doesn't fix it, git.txt contains the phone number of a friend of mine who understands git. Just wait through a few minutes of 'It's really pretty simple, just think of branches as...' and eventually you'll learn the commands that will fix everything.")
Git is a truly brilliant piece of software with pretty terrible user experience. I'm going to teach you the absolute basics today, but the absolute basics are enough for most developers.
If you want to know more, let me recommend the excellent (and free!) book 'Pro Git' Opens in a new window by Scott Chacon and Ben Straub.
Git Basics
What is a git repository?
A git repository, or "repo" for short, is a software project that uses git to keep track of its changes.
Typically, you'll have a copy on your local machine (the "local repo"), and another copy on a server somewhere (the "remote repo").
How do I get a copy?
- Open your terminal/command prompt, and change directories into the folder where you keep your projects, using the
cdcommand for Mac/Linux orSet-Locationfor Windows.
Command line basics
- Where am I?
pwd("print working directory")- What else is in here (in terms of files and folders)?
ls("list")- Go into "projects" directory
cd projects("change directory")- Go "up" one directory
cd ../- Go to my home directory
cd ~
Command line basics
- Where am I?
pwd("print working directory")- What else is in here (in terms of files and folders)?
ls("list")- Go into "projects" directory
cd projects("change directory")- Go "up" one directory
cd ../- Go to my home directory
cd ~
- Run the command
git clone git@github.com:HTTP5105/emilio-estevez.git
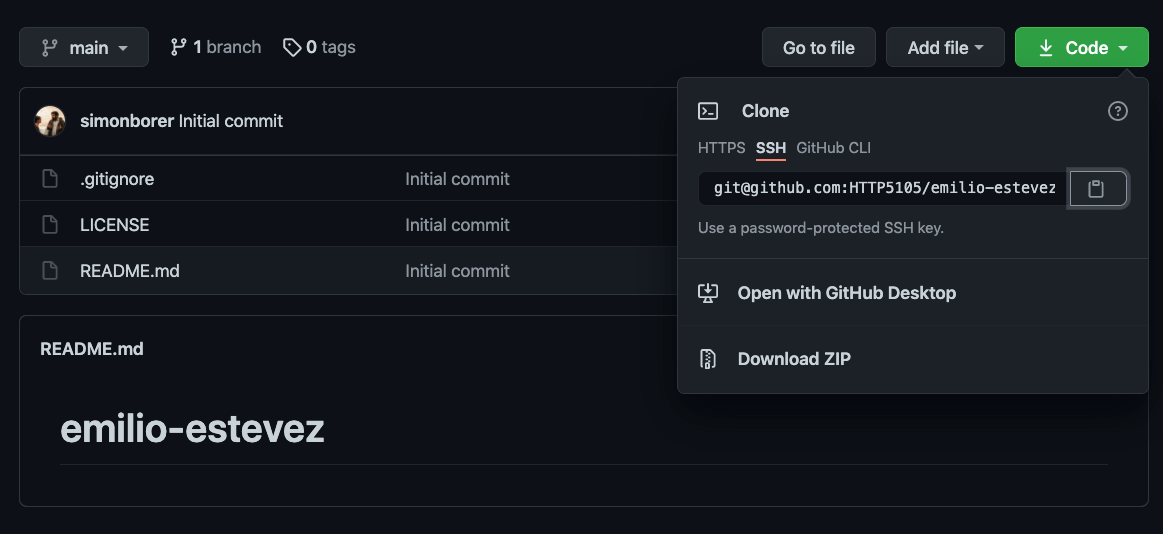
- There's no step three! The repo has been downloaded onto your computer and you now have a full copy of the files, folders and git history.
Ignoring files and folders
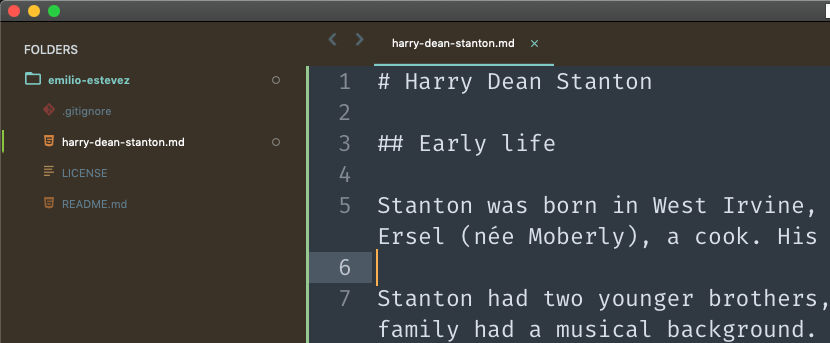
I want you to take note of a file in this repo that you've just downloaded: .gitignore.
The dot at the beginning of the file name means that it will be "hidden" in most file system viewers, but if you're using a modern code editor, you should be able to see it when you open the repo's folder with your code editor.
This file contains a list of files and folders that will not be tracked by git.
If git is so great, why would we want to not use it with some files and folders?
Three reasons:
- Any files containing sensitive information like database passwords should be ignored
- Any files that are too big (i.e. 20mb+ - git will reject any files bigger than 100mb)
- Any "dependencies" that can be installed separately. I'll leave this one vague, but we'll definitely learn more about this during our lesson on NodeJS.
Ignoring files and folders
I want you to take note of a file in this repo that you've just downloaded: .gitignore.
The dot at the beginning of the file name means that it will be "hidden" in most file system viewers, but if you're using a modern code editor, you should be able to see it when you open the repo's folder with your code editor.
This file contains a list of files and folders that will not be tracked by git.
If git is so great, why would we want to not use it with some files and folders?
Three reasons:
- Any files containing sensitive information like database passwords should be ignored
- Any files that are too big (i.e. 20mb+ - git will reject any files bigger than 100mb)
- Any "dependencies" that can be installed separately. I'll leave this one vague, but we'll definitely learn more about this during our lesson on NodeJS.
How do I make changes?
At this point, you can edit the files as you normally would in any project.
For our purposes, let's add a new file called harry-dean-stanton.md, and write some stuff in it.
Git
Git status
Before we start adding files, though, let's check on git's status:
git status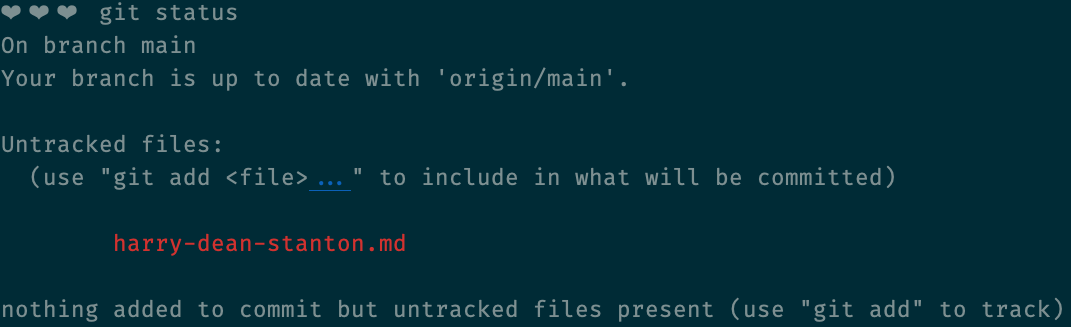
Adding files to git tracking
git add harry-dean-stanton.md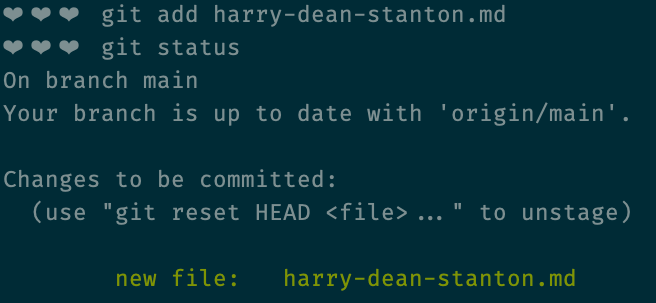
Alright, so now we've added the file to the git repo, and it's telling us to commit? Why do we have to commit it if we've already added it?
It's best to think of your repo having a "rough draft" stage. You work on stuff in your working directory, add it to your "rough draft", and when it's ready to be sync'd up with the remote repo (which, remember, other developers are working with), then you make your commits.
Committing changes
git commit -m 'Message about what you did'
Notice the use of the -m "flag" to allow us to type out the (required) message that goes along with our commit.
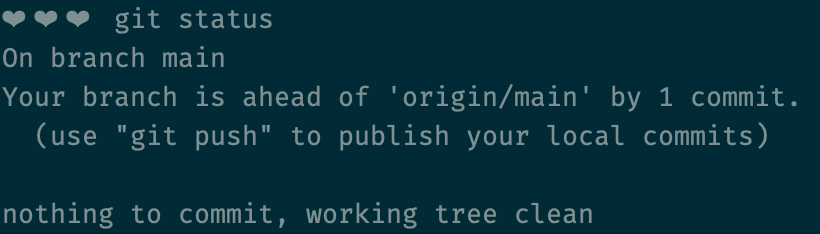
Let's check our status again and see if we're ready to sync up our commits with the remote repository.
Pulling changes from remote
git status is telling us we're ready to push! It's time to synchronize with our remote repo.
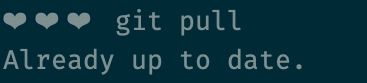
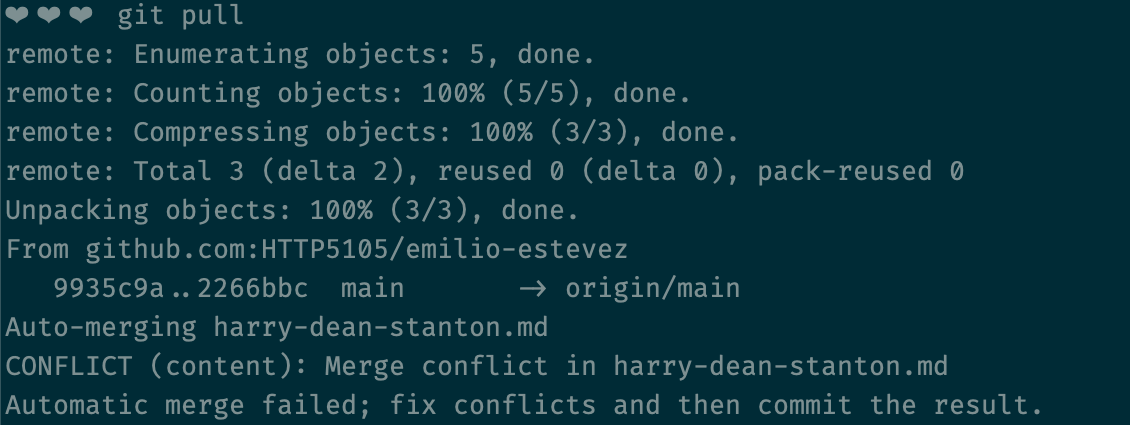
Before we push, it's a good idea to pull.
git pullThis tries to merge any code that might've been updated on the remote repo with your local repo. Best to resolve conflicts locally before you push.
Pushing changes to remote
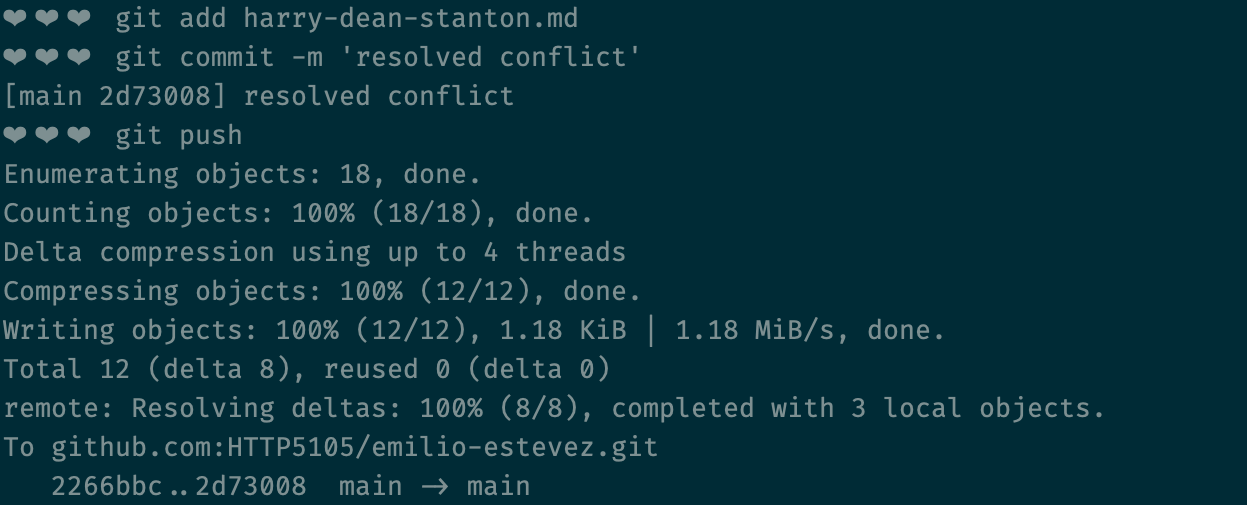
Once you're all up-to-date, you can push your commits to the remote repository!
git push
What would've happened if there had been changes in the remote repository before we pulled?
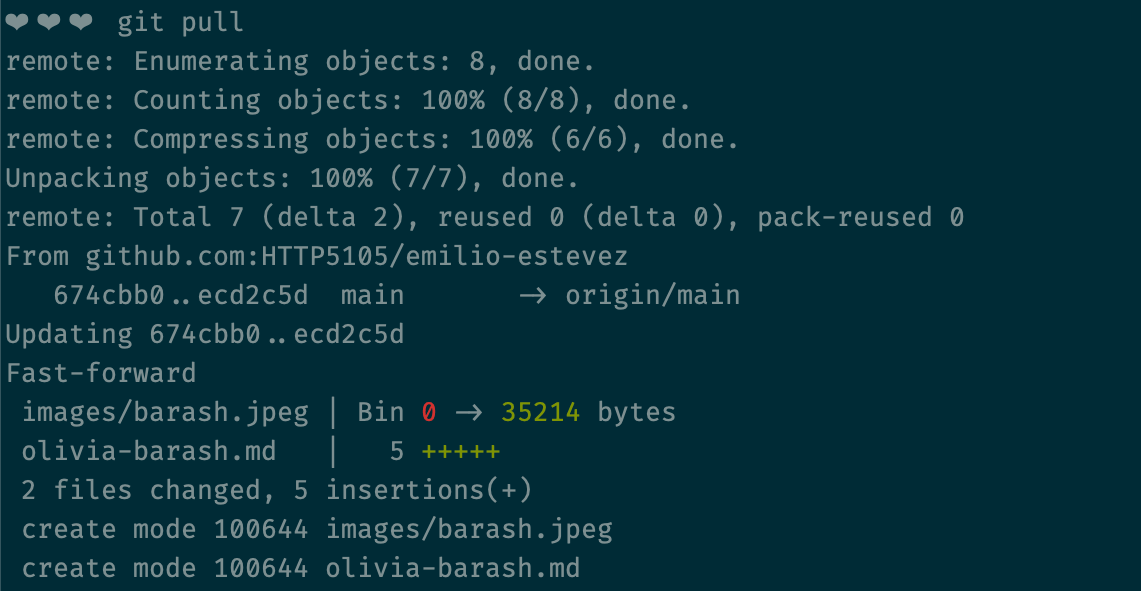
What's amazing is that even if you're working on the same file as somebody else, you can still pull their changes into your local repo without there being a problem.
You really only run into an issue with you've made a change on the same line where there's been a change on the remote.
Resolving merge conflicts
Let's say there is a change on the remote that is on the same line of the same file in the same branch (more on branches later) as your work.
At that point, git will have injected some content into your file. You then have to edit the file, which now contains both your changes and the changes to the remote.
On top will be your changes (the "HEAD"), and underneath, separated by a row of equal signs, will be the alternate changes from the remote repo. Finally, there will we a row of "greater than" symbols.
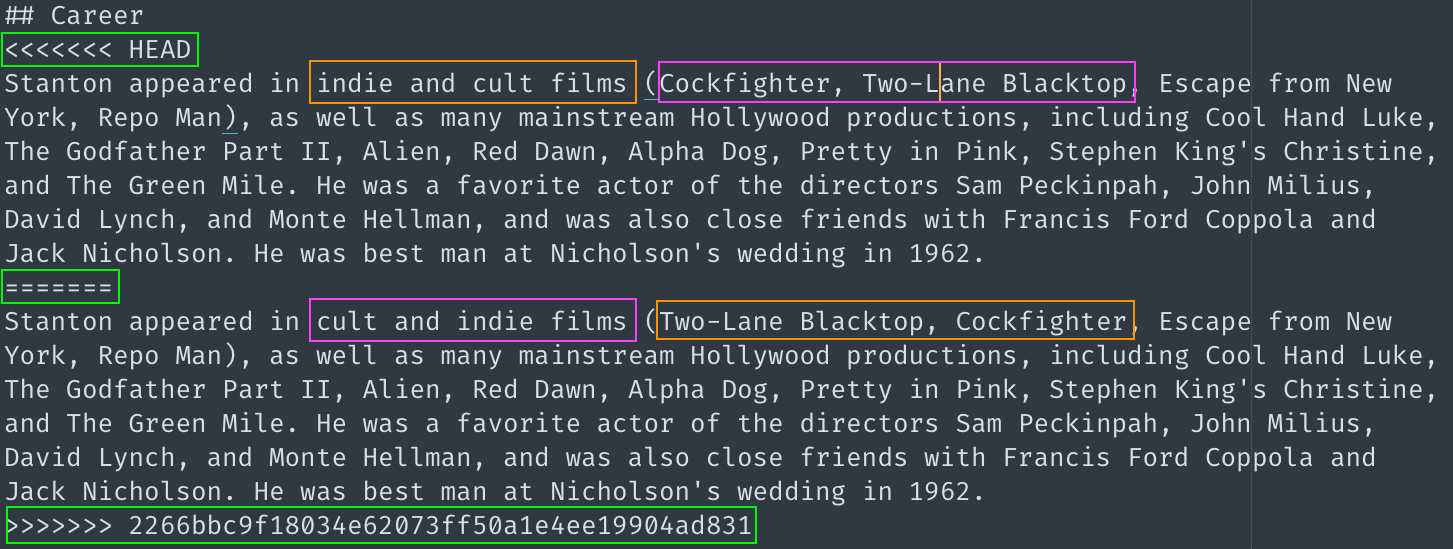
All you have to do to resolve the conflict is decide what changes to keep, and what changes to discard. Edit the file so that it looks the way you think it should, deleting the added lines (like the equal signs and whatnot). Finally, git add the file, commit and push your changes.
Git branching
Remember earlier when I said that git didn't just give us the option to time travel, but also to branch off into different timelines?
With "branches", git allows us to split off temporarily from the existing repo, do our work, and push it to the remote repository without it affecting other developers.
When your work is ready to be re-integrated with whatever other developers have been working on, you can merge your work back into the main branch.
Git branching is often a major part of how a team structures their workflow. There might not be a single "main" branch, but multiple branches that represent the development, testing and production versions of the application. Merging into different branches may trigger automated processes, like testing (which you've seen with our Github Classroom lab exercises), but also code compilation, optimization, deployments - all kinds of things.
We'll look at how a team might structure their git workflow later in this lesson, but first, let's look at how git branching is done.
Creating a branch
Creating a branch in git is easy - just use the following command:
git branch [some-name-for-your-branch]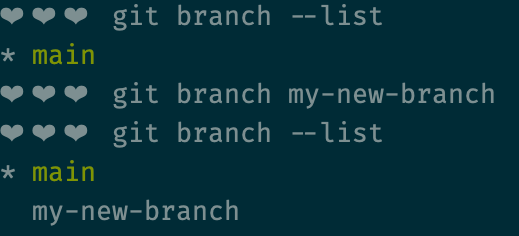
git branch --list, or simply git branchNotice the asterisk (*) in the screenshot? That's indicating the branch that we're currently "on". If you open the files in your code editor, the code you see will be the code stored in the branch with the asterisk. If we make changes to the code, we'll be making changes to, adding to, and committing to the code in the branch with the asterisk.
Checking out a branch
To change which branch you're working on, you need to "check out" the branch that you want to switch to.
git checkout [some-name-for-your-branch]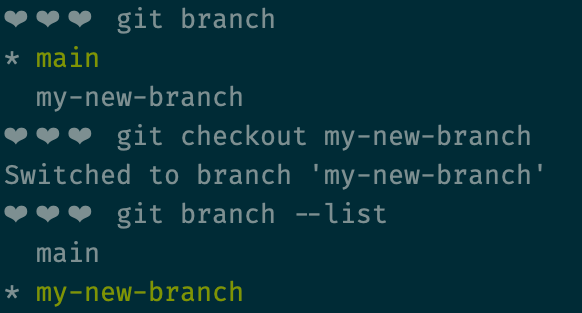
Creating a remote branch
Once you've created a branch and switched to it, you can add and commit files as usual. However, when it's time to push to the remote repository, the branch has to exist in the remote repo before you can push to it.
We can do simultaneously create the remote branch and push our code in one line by writing the following command:
git push -u origin [some-name-for-your-branch]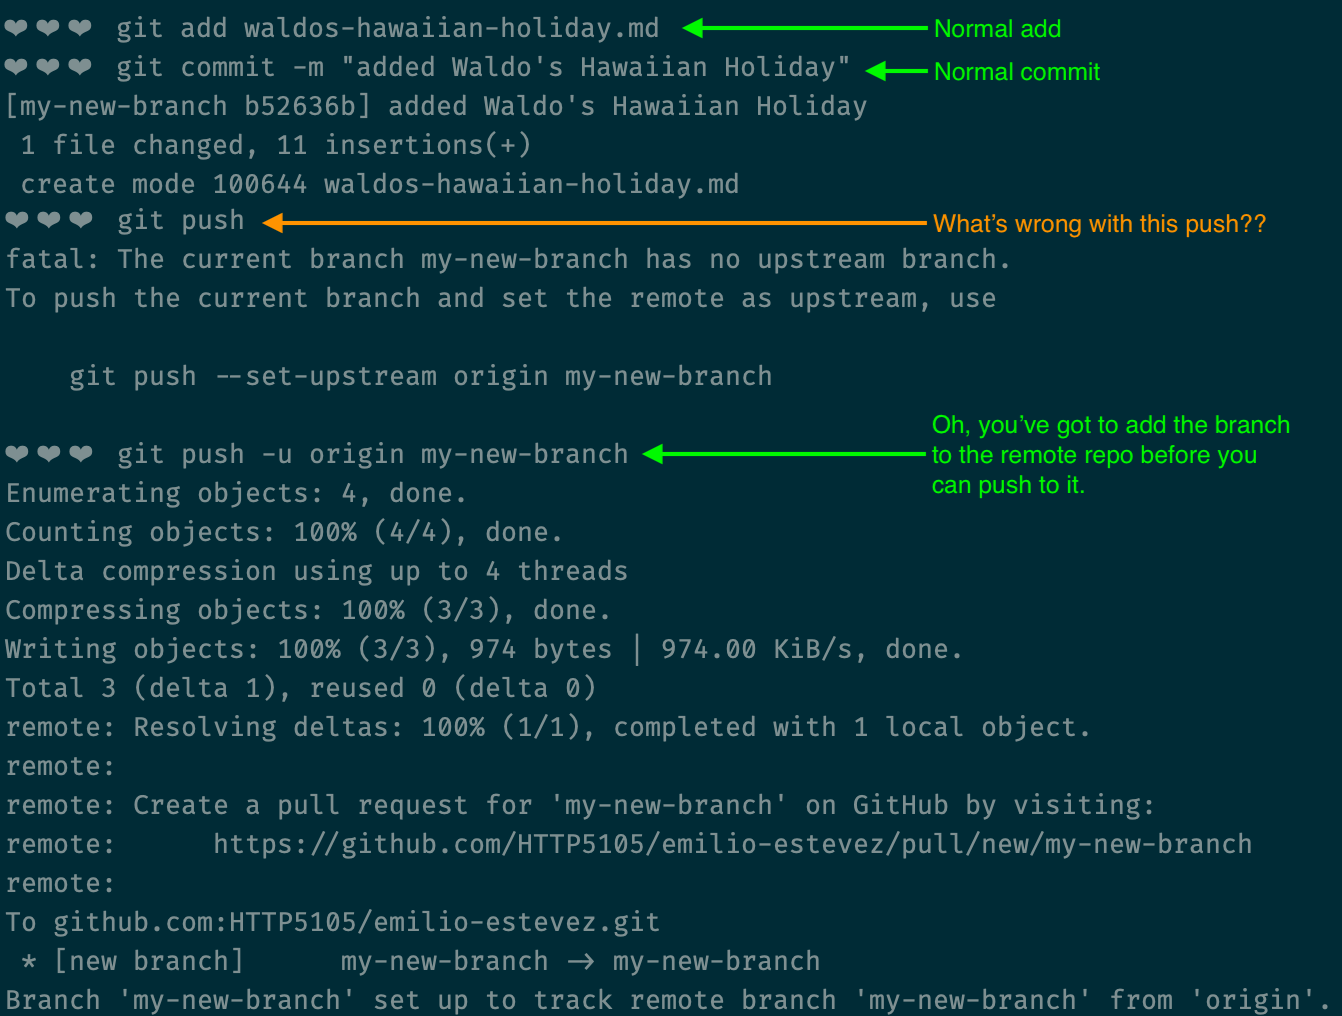
That's it! When you're ready, go to your remote repo and create a pull request, and get someone to code review it.
If you're at this point, it's probably time to run the following commands to get started on your next task:
git checkout main
git pull
git branch [another-branch-name]
git checkout [another-branch-name]
This will put you back on your main branch, make sure your code is up-to-date with the remote repo, and put you on a whole new branch to begin your next piece of work.
- git - the simple guide Opens in a new window, Roger Dudler
- Oh Sh*t, Git!?! Opens in a new window, Katie Sylor-Miller
- Oh sh*t, git! Opens in a new window (like the above, but expanded, illustrated and in 'zine form), Katie Sylor-Miller & Julia Evans
- Learn the Basics of Git in Under 10 Minutes Opens in a new window, Gowtham Venkatesan
- How to teach Git Opens in a new window, Rachel M. Carmena
- Pro Git Opens in a new window, Scott Chacon and Ben Straub

How Do Teams Use Git?
As we talked about, git branching can be used to manage collaboration, and also to trigger powerful commands and deployment strategies. Let's talk about it!
Git workflows
A git workflow (or "branching model") is a team standard Opens in a new window. Like other team standards, the most important thing is consistency.
There are many Opens in a new window branching Opens in a new window models Opens in a new window out there.
I'm going to show you one today - GitLab Flow. It's one of the best-known git workflows, but expect different teams to use alternatives, or to have their own modified version of this one.
The precursor to GitLab Flow
The best-known git branching model is gitflow Opens in a new window, first described by Vincent Driessen in 2010.
Gitflow was based on an older software development model where you released slowly and supported multiple versions of a piece of software. It involved a number of different types of branches, including multiple "main" branches, feature branches, "hotfix" branches for bug fixes that need to 'skip the queue', and so on. Since that software development lifecycle doesn't reflect most work on the web today, Driessen himself no longer recommends Gitflow for most web applications.
The (too?) simple competitor of GitLab Flow
Github Flow Opens in a new window was introduced a few years later as a lightweight alternative. Github Flow is essentially the simple workflow I described in the first part of this lesson:
main [remote]
    → main [local]
    → feature-branch [local]
    → feature-branch [remote]
    → pull request
→ main [remote]
GitLab Flow
GitLab Flow is what I consider a "happy medium" between these two.
It allows for multiple "environment" branches - branches that reflect a staged deployment through QA, UAT, and production - without the complications of reflecting an outdated software development paradigm.
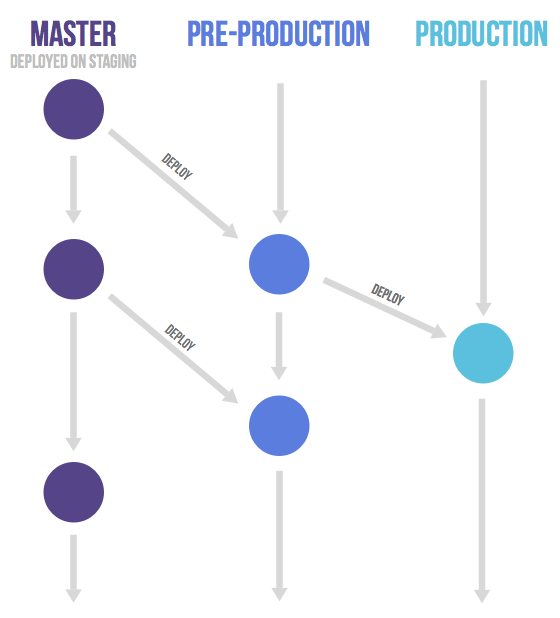
Developers still use a feature branching model (like Github Flow), working off a shared main branch, but other environments can be represented as "downstream" branches, in order to work with a multi-staged deployment.
GitLab also nicely documents smaller details about the workflow, like when to run tests, how to open issues, and how to phrase your commit messages.
All in all, a pretty nice system!
Git and the deployment pipeline
A git workflow is often the basis for continuous integration/continuous deployment operations, also known as a "CI/CD pipeline".
Continuous Integration
Continuous integration is the practice of frequently (at least daily) merging developers' code, where each merge triggers automated testing on the main branch.
This prevents a bottleneck - the moment when a deadline comes up, all developers try to merge, and are faced with dozens of failed test and hundreds of merge conflicts.
Continuous Deployment
Continuous deployment means that your software is automatically deployed to production when it's ready (which is frequently, as continuous integration is a pre-requisite for continuous deployment).
The definition of "ready" will depend on the workplace, but one simple example of this is in the instructions for deploying via Netlify Opens in a new window that I provided to you wherein the site is made public anytime a commit (including a merge) is made into the main branch.

What is Code Review?
Code review is a common element of a team's workflow. In many teams, when your branch is ready to be merged into the main branch, you are required to ask for a code review. After another developer has reviewed your code, they may ask you to make changes to meet with team standards. When they approve of your code, they (not you) will then merge it into the main branch.
Just to reiterate, this is one possible workflow. I'm choosing to describe this workflow because it's quite common, but every team is different!
Here is the process for requesting and conducting a code review through Github. Note that you can click any of these screenshots to enlarge them.
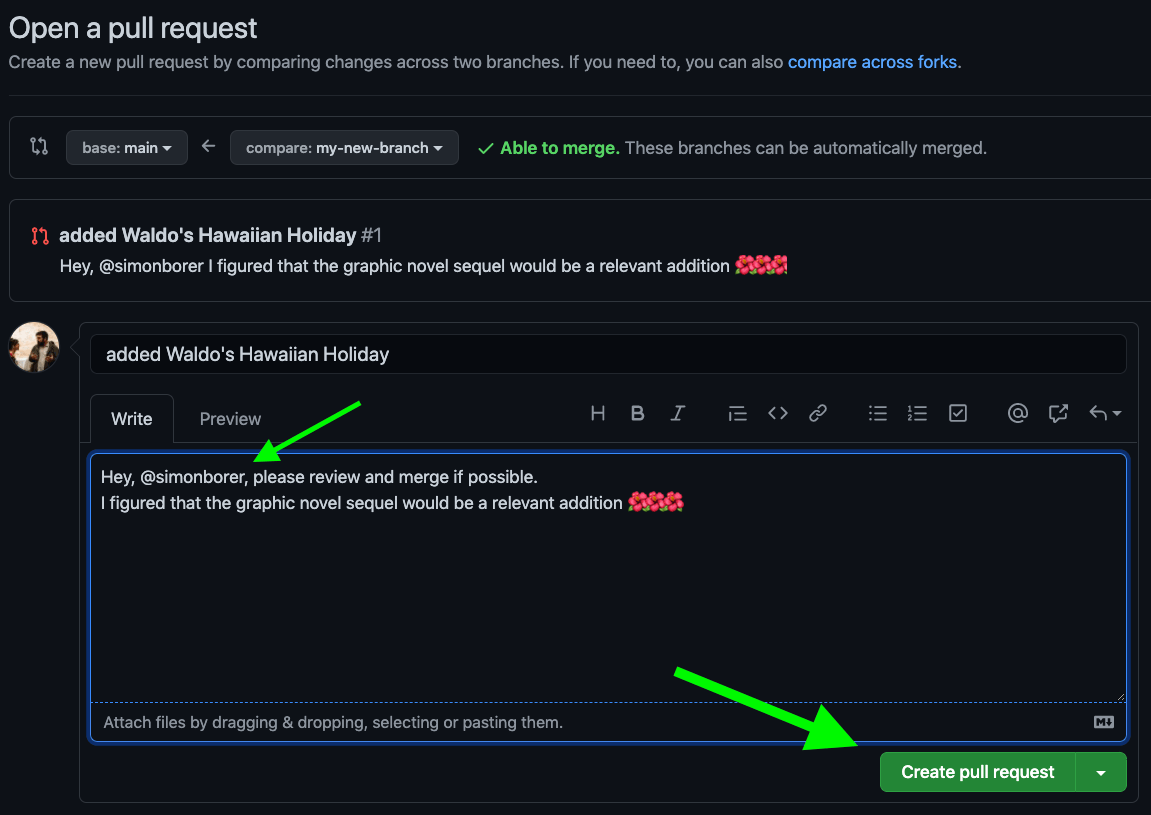
Creating a PR (pull request)
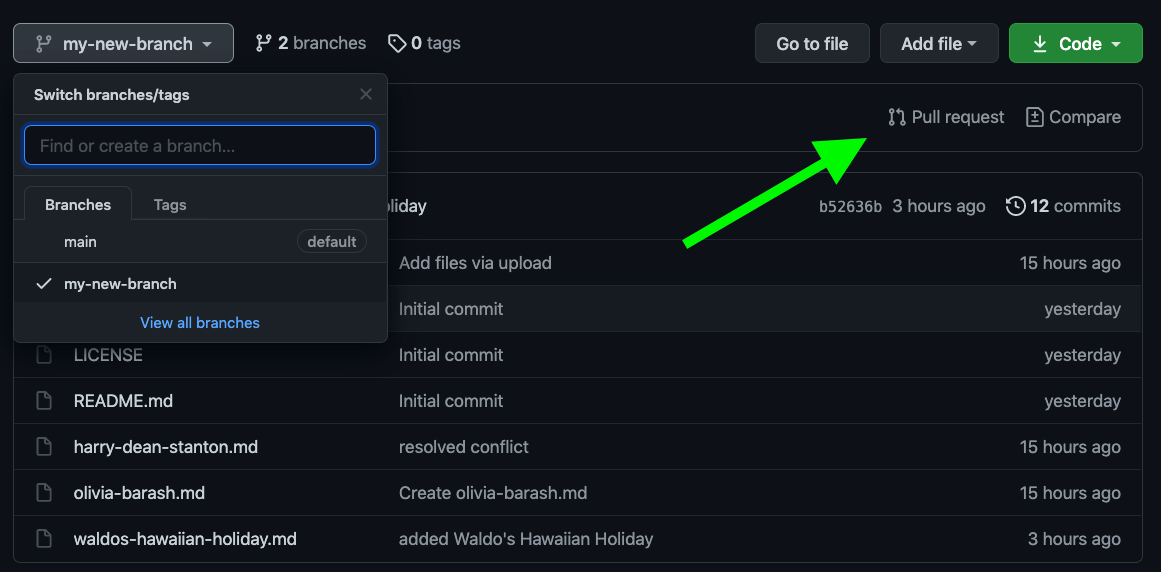
Requesting a code review
Responding to a code review request

Adding comments to lines of code
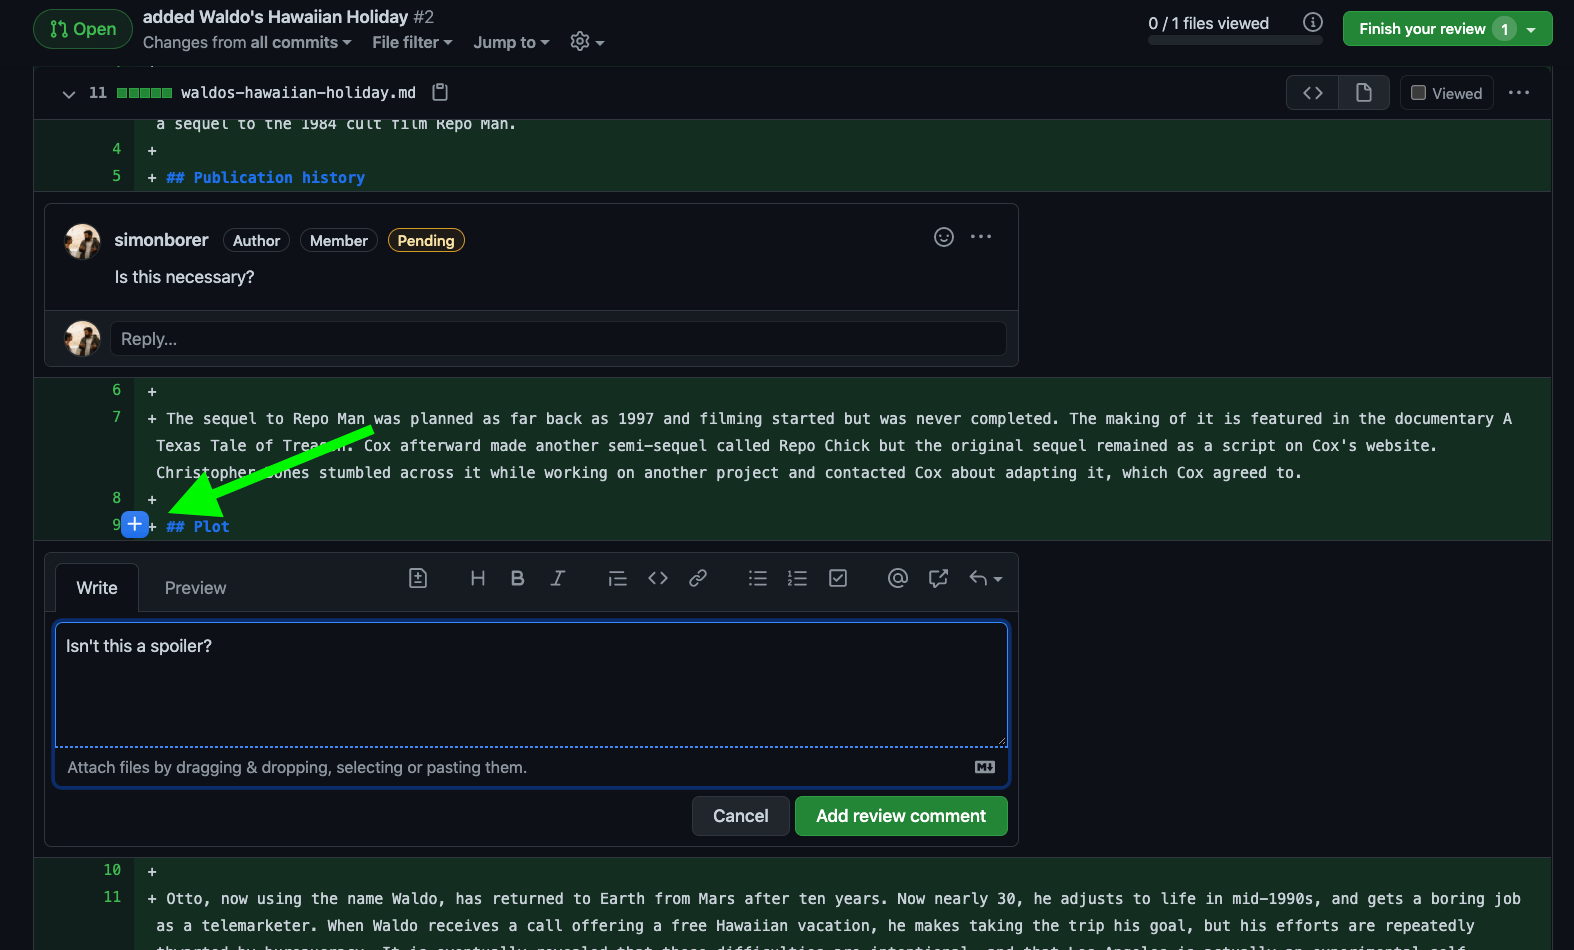
Submitting your code review


Giving good feedback
A code review isn't a movie review! Movie reviewers aren't on the same team as the filmmakers, don't get to ask for changes, and don't have to sit next to them at team lunches. Code reviews are part of a collaborative process.
To quote Springsteen paraphrasing civil rights badass Fannie Lou Hamer Opens in a new window, "nobody wins unless everybody wins".
Review to understand.
Use your own ability to understand the code you're reviewing as a benchmark for how well-written the code is. Don't let your impostor syndrome Opens in a new window be responsible for letting bad code into the code base! If the code isn't properly commented, uses non-standard syntax, or is badly convoluted, it probably isn't going to be much use to the team in the long run.
On the other hand, maybe you're right and you're a total dummy. Code review is a great chance to fix that! On most teams I've worked on, most other developers knew more than me about some aspect of coding, and I got to learn really cool stuff by asking questions during code review.
Review for success.
Be positive in your code reviews! When someone does something cool, let them know. Your goal is not to point out mistakes, your goal is to have your team write great code.
When you do need to request changes, be specific, and, where possible, point them in the direction of the resources they need - preferably internal team documentation.
Recognize where process needs improvement.
Code review should be your team's last line of defense before your code heads to the QA team.
Syntax and style errors should be caught by the code author with automated testing. Anything not automated should be clearly described in the documentation. Only when automation and documentation falls short should you be requesting changes in code review.
If you find yourself catching (or, heaven help you, discussing in the comments) things that should be caught by automation or documentation, it may not be an issue that should be resolved in a single code review - it should be logged and resolved as a team effort.

Getting good feedback
The best way to get good feedback isn't to write good code - it's to make reviewing your code as easy as possible.
- Keep PRs small and focussed (break them up if you need to)
- Write out a list of changes
- Pass your tests first
- Be grateful they caught your mistakes
- 1. Table of Contents
- 2. What is Version Control?Now you've used
- 3. Maybe time to give Figma a try.
- 4. One of the most magical things about computers is the time-travel afforded to us by the concept of undo and redo. Extending this magic to every change made to a file, indefinitely, is a really powerful idea.
- 5. I do not foresee any complications with this simple concept.
- 6. The standard in software development today is to use a distributed version control system, where each contributor has a copy of the whole codebase, including the full history, on their machine.
- 7. Notice I'm saying 'git' and not 'Github' (despite the fact that pretty much everybody uses Github, too).That's because git is a piece of open-source software. Github is a company owned by Microsoft that lets you host your remote git repositories with them. You don't need Github to use git - you can host your own repositories, or host them with a Github competitor like GitLab Opens in a new window or Bitbucket Opens in a new window.
- 8.
- 9. Git is a truly brilliant piece of software with pretty terrible user experience. I'm going to teach you the absolute basics today, but the absolute basics are enough for most developers.
- 10. Git Basics
- 11. What is a git repository?
- 12. How do I get a copy?
- 13. Ok, I'm not super familiar with Powershell, but from what I understand, most basic Linux commands are used as aliases in Powershell, so I'm going to start writing out most command-line instructions using just the Linux commands. If you're using Powershell, and the commands I'm providing aren't working for you, please let me know.
- 14. Command line basics
- 15. Run the commandgit clone git@github.com:HTTP5105/emilio-estevez.git
- 16. Wait, where did that URL thing come from?If you're cloning a repo from github, you can click on the dropdown from the green "code" button to get the URL.
- 17. There's no step three! The repo has been downloaded onto your computer and you now have a full copy of the files, folders and git history.
- 18. Ignoring files and folders
- 19. This file contains a list of files and folders that will not be tracked by git.
- 20. Three reasons:
- 21. How do I make changes?
- 22. Git doesn't automatically start tracking anything that happens to be in the same folder. You have to explicitly add the file to the repo.
- 23. Git status
- 24. Adding files to git tracking
- 25. Alright, so now we've added the file to the git repo, and it's telling us to commit? Why do we have to commit it if we've already added it?
- 26. Committing changes
- 27. Let's check our status again and see if we're ready to sync up our commits with the remote repository.
- 28. Pulling changes from remote
- 29. Pushing changes to remote
- 30. What would've happened if there had been changes in the remote repository before we pulled?
- 31. What's amazing is that even if you're working on the same file as somebody else, you can still pull their changes into your local repo without there being a problem.
- 32. Resolving merge conflicts
- 33. On top will be your changes (the "HEAD"), and underneath, separated by a row of equal signs, will be the alternate changes from the remote repo. Finally, there will we a row of "greater than" symbols.
- 34. All you have to do to resolve the conflict is decide what changes to keep, and what changes to discard. Edit the file so that it looks the way you think it should, deleting the added lines (like the equal signs and whatnot). Finally, git add the file, commit and push your changes.
- 35. Git branching
- 36. Git branching is often a major part of how a team structures their workflow. There might not be a single "main" branch, but multiple branches that represent the development, testing and production versions of the application. Merging into different branches may trigger automated processes, like testing (which you've seen with our Github Classroom lab exercises), but also code compilation, optimization, deployments - all kinds of things.
- 37. Creating a branch
- 38. You can see what branches are available, and which branch you're currently "on" with the command git branch --list, or simply git branch
- 39. Checking out a branch
- 40. Creating a remote branch
- 41. We can do simultaneously create the remote branch and push our code in one line by writing the following command:
- 42. That's it! When you're ready, go to your remote repo and create a pull request, and get someone to code review it.
- 43. If you're at this point, it's probably time to run the following commands to get started on your next task:
- 44. How Do Teams Use Git?As we talked about,
- 45. Git workflows
- 46. The precursor to GitLab Flow
- 47. The (too?) simple competitor of GitLab Flow
- 48. GitLab Flow
- 49. Developers still use a feature branching
- 50. GitLab also nicely documents smaller details about the workflow, like when to run tests, how to open issues, and how to phrase your commit messages.
- 51. Git and the deployment pipeline
- 52. Continuous Integration
- 53. Continuous Deployment
- 54. What is Code Review?
- 55. Code review is a common element of a team's workflow. In many teams, when your branch is ready to be merged into the main branch, you are required to ask for a code review. After another developer has reviewed your code, they may ask you to make changes to meet with team standards. When they approve of your code, they (not you) will then merge it into the main branch.
- 56. Just to reiterate, this is one possible workflow. I'm choosing to describe this workflow because it's quite common, but every team is different!
- 57. Creating a PR (pull request)
- 58. Requesting a code review
- 59. Responding to a code review request
- 60. Adding comments to lines of code
- 61. Submitting your code review
- 62. Giving good feedbackA code review isn't
- 63. Review to understand.
- 64. Review for success.
- 65. Recognize where process needs improvement.
- 66. Getting good feedback
- 67. The best way to get good feedback isn't to write good code - it's to make reviewing your code as easy as possible.